
WifiObserver에서 서비스에 등록된 기기가 와이파이 공유기에 얼마 동안 연결되어 있는지 파악하는 기능을 구현하였습니다.
해당 기능 구현을 위해서는 공유기 관리자 페이지를 주기적으로 크롤링하여 공유기 관리자 페이지가 제공하는 연결 기기 목록을 조회할 필요가 있습니다.
해당 글에서는 Spring Batch를 활용해 해당 기능을 어떻게 구현하였는지 소개하려 합니다.
배치 실행
- Cron
- 클라우드 서버리스(AWS Lambda)
- API
- Quartz Scheduler
- CI 서비스 (Jenkins / Teamcity 등등)
Spring Batch는 아직 확실한 표준 관리 도구가 없어 위와 같이 다양한 방법을 사용할 수 있다고 합니다.
해당 프로젝트에서는 Quartz Scheduler를 활용하여 배치 실행을 구현하였습니다.
다양한 선택지 중 해당 프로젝트에서 Quartz Scheduler를 선택한 이유는 코드 내에서 비교적 쉽게 이를 구현할 수 있다는 장점 때문입니다.
다중화된 배치 서버
- 클라우드 스케줄러 + 클라우드 서버리스
- 클라우드 스케줄러 + API
- Quartz Scheduler 클러스터링
- CI 서비스 Master/Slave 구조
배치 서버를 다중화한다면 Quartz Scheduler 역시 클러스터링을 구성하여야 하기에 단일 서버와 다르게 구현의 복잡성 역시 올라갑니다.
이에 다중 배치 서버를 구성해야 하는 프로젝트에서는 상황에 따라 위와 같은 다양한 방법을 고려하여 배치 실행을 구현할 수 있습니다.
사전 단어 정의
Job: 하나 이상의 Step을 가지며, 하나의 배치 작업을 나타낸다.
Step: Job을 구성하는 독립적인 하나의 단계이다.
Job
'서비스에 등록된 기기가 와이파이 공유기에 얼마 동안 연결되어 있는지 파악하는 기능' 이 이번 프로젝트에서 구현해야 하는 배치 작업입니다.
Step
Step의 실행 단위는 'Chunk' 그리고 'Task' 2가지가 존재합니다.
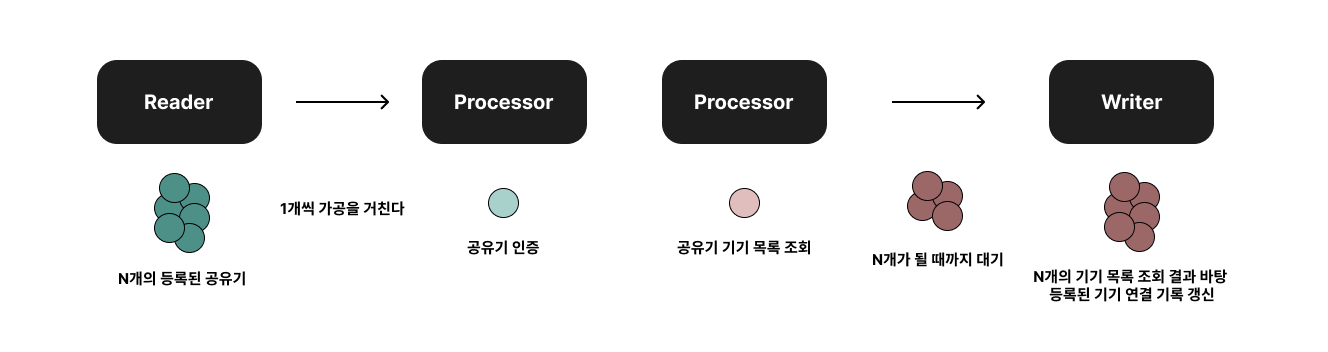
'Chunk' 기반에서 Step은 'ItemReader', 'ItemProcessor', 'ItemWriter'로 나눠서 실행됩니다.
이에 위의 Job은 아래와 같이 나뉠 수 있습니다.
- ItemReader: 서비스에 등록된 공유기 정보를 조회한다.
- ItemProcessor: 공유기에서 기기 목록을 조회한다.
- ItemWriter: 조회한 결과를 바탕으로 등록된 기기의 연결 기록을 갱신한다.
ItemReader
JpaPagingItemReader를 사용하여 서비스에 등록된 공유기 정보를 조회합니다.
ItemProcessor
조회한 공유기 정보를 통해 '공유기 인증' 그리고 '공유기 기기 목록 조회'를 수행합니다.
해당 과정에서 수행하는 공유기와 관련된 작업은 Http 통신을 활용하는 작업인 만큼 작업의 실패에 대비하는 것이 중요합니다.
Retry
Http 통신이 일시적으로 오류가 생긴 것일 수 있기에 재시도 할 수 있습니다.
Step은 재시도를 위한 RepeatTemplate를 포함하고 있어 ItemProcessor에 별도의 설정 없이 재시도를 설정할 수 있습니다.
@Bean
public Step iptimeBrowseStep() {
        return this.stepBuilderFactory
                .get(STEP_NAME)
          		...
                .reader(READER)
                .processor(PROCESSOR)
                .writer(WRITER)
              	.faultTolerant() // FaultTolerantStep이어야 재시도 가능
              	.retry(RETRY_TARGET_EXCPETION_CLASS) // 재시도 대상 예외
              	.retryLimit(RETRY_LIMIT_COUNT) // 최대 재시도 횟수
              	.build()
}
Recover
설정한 최대 재시도 횟수만큼 재시도 이후에도 오류가 여전하다면 오류에 대한 회복이 필요합니다.
FaultTolerantStep의 기본 회복 설정은 RetryException 발생이며 별도의 회복 과정을 해야 한다면 Retry와 달리 추가적인 구현이 필요합니다.
회복이 필요한 ItemProcessor, ItemWriter를 구현할 때 RetryTemplate를 활용하여 구현합니다.
일반적인 구현과 RetryTemplate를 활용하여 구현의 차이는 RetryCallback, RecoveryCallback을 설정할 수 있다는 것으로 RecoveryCallback를 구현하며 필요한 회복 과정을 정의합니다.
public class RetryAbleXXXProcessor    implements ItemProcessor<XXX, XXX> {

  private final RetryTemplate retryTemplate;
  private final XXXProcessor xxxProcessor; // 재시도와 회복과 관련없이 process 과정을 정의한 클래스
  ...

  public XXX process(XXX item) {
    return retryTemplate.execute(
      new RetryCallback<XXX, XXX>() {
        @Override
        public XXX doWithRetry(RetryContext retryContext) throws XXX {
          return xxxProcessor.process(item);
        }
      },
      new RecoveryCallback<XXX>() {
        @Override
        public XXX recover(RetryContext retryContext) {
          // 회복 과정
          return XXX (or null);
        }
      }
    )
  }
}
ItemWriter
공유기 조회 결과를 바탕으로 등록된 기기의 연결 기록을 갱신합니다.
이는 아래와 같은 순서로 진행됩니다.
- 라우터에 등록된 기기를 조회합니다.
- 라우터의 등록된 기기 연결 기록을 조회합니다.
- Processor에서 수행한 공유기 조회 결과와 1번에서 조회한 라우터에 등록된 기기를 비교하여 접속 중인 등록된 기기를 필터링합니다.
- 접속 중인 등록된 기기와 2번에서 조회한 등록된 기기 연결 기록을 비교하며 연결 기록을 갱신합니다.
- 현재 접속 중이고 이전 연결 기록이 있는 경우: 접속 유지 중
- 현재 접속 중이지 않고 이전 연결 기록이 있는 경우: 접속 해지
- 현재 접속 중이지만 이전 연결 기록과 해지 기록이 없는 경우: 신규 접속
- 현재 접속 중이지만 이전 연결 기록이 없고 해지 기록이 있는 경우: 재접속
Config
Job Config
@Bean(name = JOB_NAME)
public Job iptimeBrowseJob() {
  return this.jobBuilderFactory
      .get(JOB_NAME)
      .incrementer(timeStamper) // 시간에 따라 jobParameter를 변경한다
      .start(iptimeBrowseStep()) // step을 설정한다.
      .build();
}Step Config
@Bean
public Step iptimeBrowseStep() {
  return this.stepBuilderFactory
      .get(STEP_NAME)
      .<RouterEntity, RouterUsersResponse>chunk(CHUNK_SIZE)
      .reader(reader())
      .processor(processor())
      .writer(iptimeConnectHistoryWriter)
      .faultTolerant()
      .processorNonTransactional()
      .skip(AbstractRouterException.class)
      .skipPolicy(new IptimeBrowseSkipPolicy(CHUNK_SIZE))
      .transactionManager(transactionManager)
      .listener(browseStepLoggingListener)
      .build();
}.chunk(CHUNK_SIZE)
한 번에 처리될 트랜잭션 단위의 크기를 지정합니다.
Step이 동작할 때 우선 reader에서 데이터를 읽고, processor에서 이를 가공합니다.
이후 가공된 데이터들을 별도의 공간에 모든 뒤, Chunk 단위만큼 쌓이게 되면 Writer에 전달해 일괄 저장합니다.
.faultTolerant()
Retry, Skip 기능을 활성화 함으로써 내결함성 서비스를 가능하도록 합니다.
.processorNonTransactional()
Processor에 트랜잭션 작업이 없음을 Step에게 알립니다.
이는 Writer에서 발생한 예외에 의해 재처리 과정을 수행하는 경우 Processor에는 롤백 된 것이 없어 재처리하는 과정에서 제외될 수 있음을 의미합니다.
그 결과 재처리하는 과정에서 공유기를 다시 조회하는 문제도 해결할 수 있습니다.
.skip(XXXException.class), .skipPolicy(new XXXSkipPolicy(CHUNK_SIZE))
어떤 예외를 스킵할 것이고 어떠한 정책에 따라 스킵을 진행할 것인지 정의합니다.
개선 고민 사항
공유기를 조회하는 과정과 공유기 조회 결과를 바탕으로 등록된 기기의 연결 기록을 갱신 과정을 분리할 수는 없을까?
현재 배치는 위의 사진과 같이 구성되어 있습니다.
각각의 과정에서 동작을 살펴보면 Reader와 Processor을 공유기의 종류와 연관되어 있습니다. (공유기마다 기기 목록 조회에 필요한 과정이 다르기 때문)
하지만 Writer는 공유기 종류에 상관없이 동작을 수행할 수 있습니다.
이에 '현재 Writer의 동작을 분리하면 어떨까?' 라는 생각으로 이어졌습니다.
현재 Writer의 동작을 분리할 수 있다면 공유기 종류에 따라 별도의 구현이 필요한 이전의 과정과 달리 종류와 상관없이 동작을 수행할 수 있을 것으로 판단하였습니다.

Kafka, RabbitMQ와 같은 Broker를 통해 기존의 Writer를 분리할 수 있습니다.
위와 같이 구현을 분리하였을 때 얻을 수 있는 장점은 아래와 같습니다.
- 공유기 종류에 따라 Writer를 중복해서 구현하지 않아도 된다.
- Writer가 처리할 수 있는 양 이상의 요청이 발생한다면 Writer만 스케일 아웃할 수 있다.
- 기기 목록 조회 결과가 필요한 다른 요구사항이 추가된다면 Broker에 해당 Writer을 연결하여 처리하기만 하면 된다.
"공유기 인증과 기기목록 조회 과정의 실패에 대비하기 위해 설정하였던 재시도에 의한 병목현상은 어떻게 해결할 수 있을까?"

IPTIME 공유기는 위의 사진과 같이 로그인 과정에서 캡차 인증이 추가될 수가 있습니다.
캡차가 발생할 때에는 기존 로직에서는 로그인 과정에서 예외가 발생하게 됩니다.
예외 발생으로 재시도가 일어나게 되고 해당 과정이 다수 공유기에서 발생한다면 이는 병목이 될 수 있다는 판단을 하였습니다.
인증 과정에서 소요되는 시간(t)을 5ms라고 하고 재시도 횟수(r)를 3번이라 하면 아래와 같은 결과를 확인할 수 있습니다.
| 사례 1 | 사례 2 | |
|---|---|---|
| 성공 횟수 (n) | 100 | 50 |
| 실패 횟수 (m) | 0 | 50 |
| 소요 시간 | 500ms | 7750ms |
계산 공식 : (t * n) + (m * (t * r))
IPTIME 공유기는 인증 결과가 쿠키로 제공됩니다.
로그인 과정에서 캡차가 발생하기에 로그인 성공 이후 쿠기 정보를 데이터베이스에 저장하여 재사용하는 방법을 고려하기도 하였습니다.
하지만 해당 방법을 사용한다면 인증을 처리하는 Processor와 기기 목록을 조회하는 Processor 간의 연관이 생겨 아래와 같이 구현이 복잡해진다는 단점이 있었습니다.

위에서 공유기 기기 목록 조회 Processor의 구현이 복잡해지는 것은 이를 "배치 파이프라인 안에서 해결하려고 하였기 때문이지 않을까?" 라는 생각을 하였습니다.
이에 인증 결과를 저장하여 사용하지만, 배치 파이프라인을 길게 가지고 가기보다는 아래의 사진과 같이 큐를 활용하여 이를 분리하여 처리하는 방법을 고민하기도 하였습니다.

마치며
처음 배치를 도입할 때만하여도 배치를 익히고 구성하는 것에 급급하여 다양한 고민을 하지는 못하였던 것 같습니다.
조금 시간이 지났지만 이번에 해당 프로젝트를 정리하며 당시에는 보지 못했던 문제를 발견하고 고민할 수 있어 의미가 있었던 시간이었던 것 같습니다.
앞으로도 같은 코드, 기능을 구현하면서도 더 많은 것을 고려할 수 있는 개발자가 될 수 있도록 노력하겠습니다.
감사합니다.
참고 링크
'개발' 카테고리의 다른 글
| 도메인 객체 도입하기 (0) | 2024.04.06 |
|---|---|
| GCP로 프로젝트 배포하기 (0) | 2024.04.02 |
| Consumer Acknowledgements (0) | 2024.03.12 |
| RabbitListener 등록과 동작 (0) | 2024.03.12 |
| AMQP 0-9-1(RabbitMQ) 문서 정리 (0) | 2024.03.11 |